Have you ever captured a group photo of your friends, cropped it, and the picture got blurred? To make the cropped picture crisp and sharp, we need to add the missing pixels. Low-resolution photos cannot retain the fine details of a picture. These photos are the reason for a bad user experience in digital applications and result in poor print quality. There are many tools out there to increase image resolution, but Photoshop is the most convenient for me for image upscaling. Let’s find out how to increase the resolution of an image in Photoshop in five simple steps.
Resolution is one of the major quality matrices of an image which is usually measured by the number of pixels that exist in the image. Image resolution is expressed as pixel per inch (PPI) or dots per inch (DPI) which is the count of pixels of a digital or printed image per unit area. An image with a higher resolution means it holds more details and information of the image and presents more sharpness and clarity.
Increasing image resolution can be an unavoidable task during the photo editing and manipulation process. For example, when you are swapping faces in Photoshop, the resolution of the images that you are working on should be matched. Otherwise, the photo composition will not look uniform. In such cases, image editors apply the resolution upscaling technique before applying image manipulation techniques.
Image size and image resolution are two related terms. To understand image resolution better, let’s explore these two terms from a different angle.
Image Size (Pixel dimension): Image size is often expressed as pixel dimension, which is the measurement of the actual number of pixels of an image. It is usually expressed as the number of pixels of the image vertically and horizontally. For example, a 1920×1080 image has 1920 pixels horizontally and 1080 pixels vertically. The more the pixel dimension the larger the image size is. And hence, you can visualize the image more clearly.
Image resolution (Pixel density): Resolution is the number of pixels in a certain area of an image. For example, a 300 PPI image has 300 pixels per inch. More PPI means more pixel density and enhanced ability of the image to hold its details. Thus, an image with a higher pixel density indicates higher image resolution. If you increase the size of an image by simply stretching it, the pixel density will be decreased and the image will lose its resolution.
We can increase the resolution of an image with a few simple steps in Photoshop. Let’s work on a sample image that has a 650×359 pixel dimension and 96 DPI pixel density. The image becomes blurry if we zoom it in due to low resolution. We’ll try to increase its resolution in Photoshop and increase its clarity and sharpness.

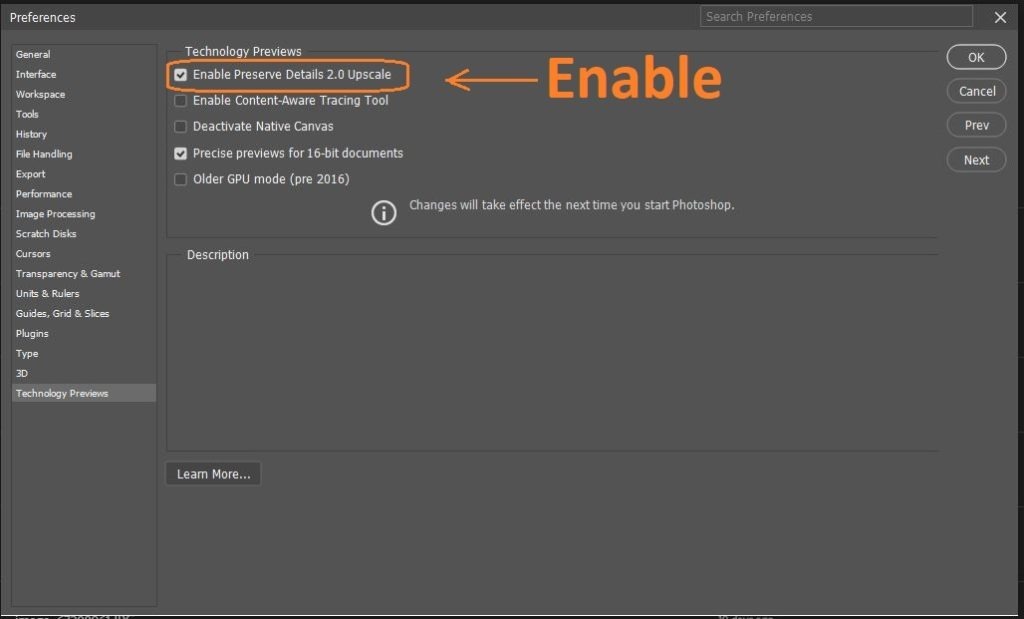
Photoshop can upscale your image resolution with its built-in automated technology. To make sure the upscaling function is enabled in your Photoshop, follow the below guidelines starting from the menu bar:
Click on Edit→ Preferences→ Technology previews. A new window will open up. Check the ‘Enable preserve details 2.0 Upscale’ and press OK. (1)
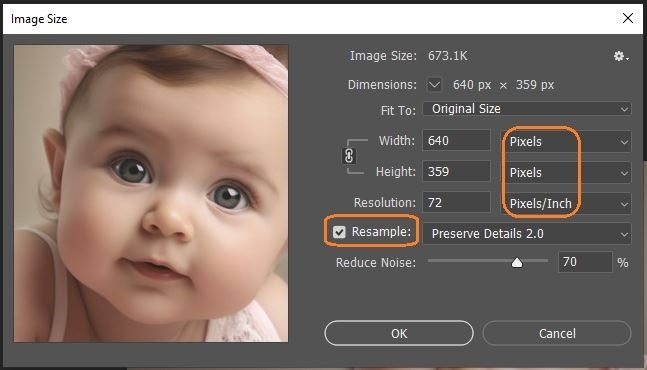
Open your image in Photoshop. Find ‘image’ at the menu bar and click on ‘image size’. A new window will pop up. First, make sure all the dimensions are set to ‘pixels’ to avoid confusion. Additionally, make sure the ‘resample’ option is checked and ‘Preserve details 2.0’ is selected. (2)
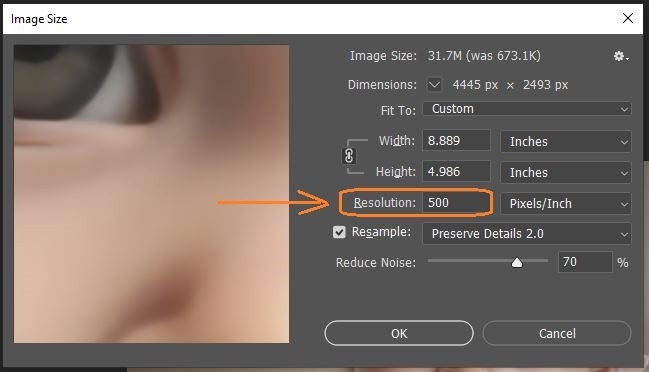
Now increase the resolution of the image manually as much as you want. In our case, we’re setting it to 500 PPI. You can see that the pixel dimension of the image is automatically increased. (3)
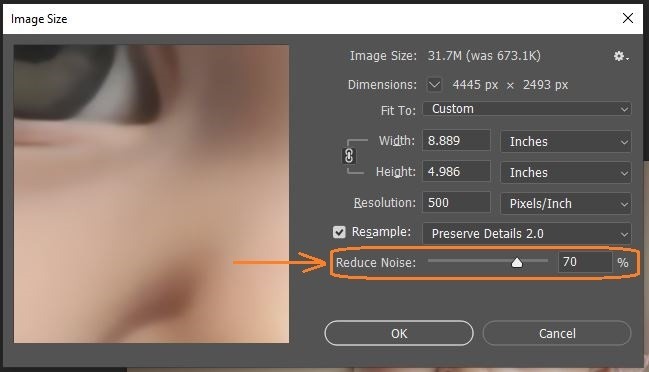
Adjust the sharpness to make the image visually more shooting. We’re setting it to 70% for our image. Now press OK. (3-1)
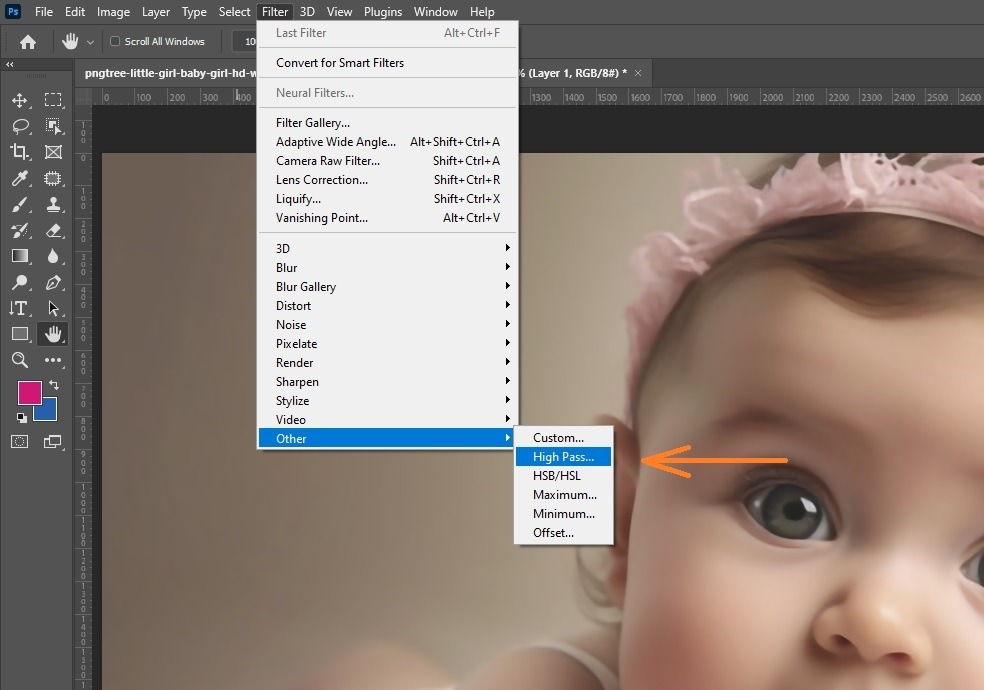
Now we apply a simple Photoshop filter to improve the image quality by making it further sharper. Before applying any filter, make a duplicate layer of the original image by pressing CRTL + J. Now navigate to the menu bar, and find Filter → Other → High pass (4).
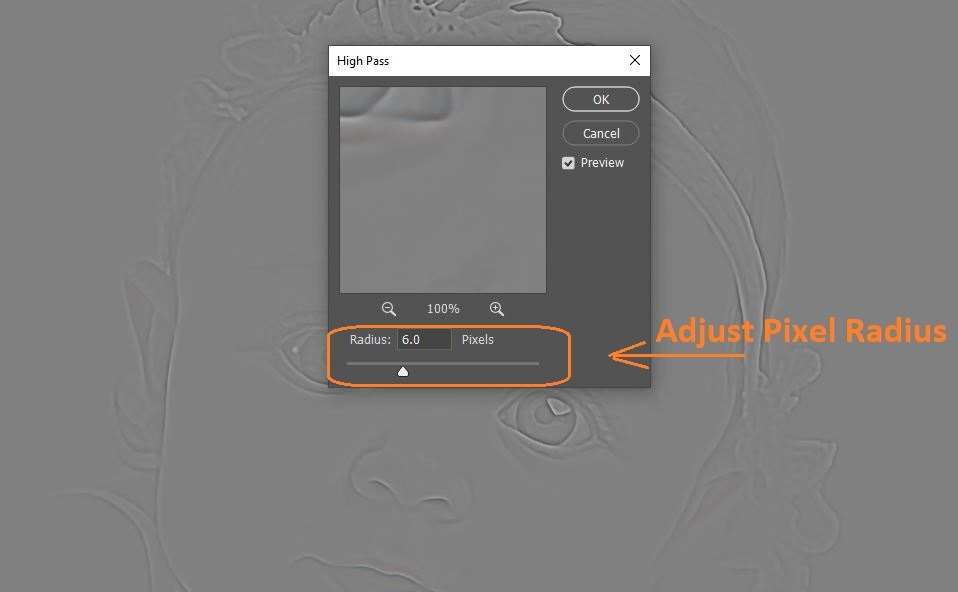
The filter will make the visual gray. Now adjust the radius of the pixel of the filter in a way that the edges of the image are slightly visible. We’re setting it to 6 in our image. Click OK after the selection. (5)
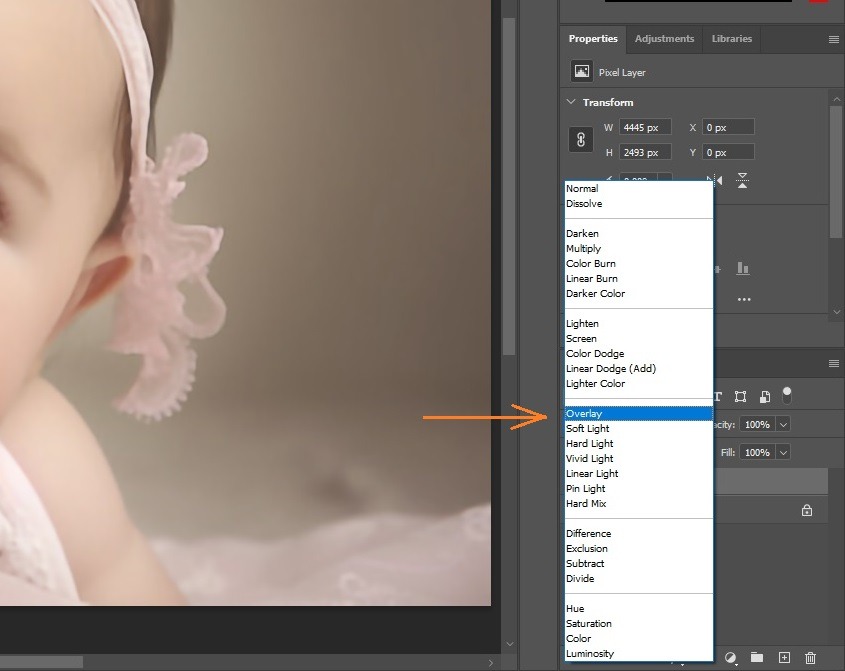
Now change the layer blending mode from normal to overlay to make the image visible. (6)
After the application of all the techniques and filters, export the image. Below is the comparison of the image before and after the application of image resolution processes. You can see the quality differences. (7)

You may not be always satisfied with image upscaling results in Photoshop. Follow the below tips while increasing image resolution in Photoshop.
The quality of the source image is the most important factor in maintaining sharpness and clarity during image resolution upscaling in Photoshop. The major quality of the source that should be considered is its resolution. Lower resolution means fewer details. If the resolution of the source file is so low that Photoshop cannot decide on the pixels it creates newly, then the quality of the output hampers.
Apart from resolution, other quality factors that should be considered for the source image are sharpness, light exposure, and noise. Higher sharpness, proper light exposure, and less noise will result in better output in Photoshop.
If you want to retain the image quality, do not upscale the image excessively. Photoshop does image upscaling using the interpolation method. It is a kind of guesswork that involves creating new pixels based on the existing ones. The more the image size, the more pixels the machine has to create. Therefore, the chances of pixilation and blurriness increase if you resize the image excessively.
Image upscaling in Photoshop may make the output softer and dull. Therefore, judiciously use sharpening tools as we apply effects during removing wrinkles from clothes. It will make the image crisp by enhancing edge contrast. Image sharpening effects can also be added using a few filters in Photoshop. Use these tools and adjust them properly to get the desired output.
Yes, increasing resolution in Photoshop has limitations. Photoshop will not add any new pixels to the image on its own. Rather, it will analyze the existing pixels and details of the image and based on that, it’ll add more pixels to increase the resolution. Therefore, if the original image doesn’t have sufficient details, then the image processed by Photoshop will lose its sharpness and clarity as well.
Yes, you can. But if the resolution is too low then the automated tool of Photoshop can not make any decision on the new pixels that it will create based on the existing detail of the image. Thus, it should have a minimum resolution, of 600 x 400p for example, to let Photoshop work smoothly.
A limited enhancement of image resolution in Photoshop may result in quite impressive output with no image distortion. However, increasing too much resolution may cause the loss of details and visible pixilation especially if the original image does not contain enough details of its own.
In general, you can increase the resolution of an image up to 300 – 400% without significant quality loss. However, the chances of quality loss of an image depend on several factors such as its original resolution and uniformness of the graphic elements.
No, image upscaling in Photoshop is a destructive process. During this process, Photoshop will read the existing pixels of the image to overwrite the original image and create new pixels on it which is a destructive image post-processing. However, if it is done properly, Photoshop may rescale the image in such a way that you cannot find any significant difference in image quality.
Increasing image resolution in Photoshop is quite simple. The process is not as complex as image vectorization in Photoshop. Image upscaling involves following a few simple steps that include image resizing and applying a few filters. The quality of photo upscaling in Photoshop may not be equal for all images. The source image should hold a minimum quality to avoid distortion, pixilation, and blurriness. After upscaling, you can apply manual image retouching techniques to make the image sharper. Additionally, you can use third-party plugins with more advanced algorithms to get better results.
Contact Details:
Phone: +8801793609089
info@photoeditup.com
Photo Edit Up
651 N Broad St, Suite 206
Middletown, DE, 19709
United States
Contact Details:
Phone: +8801793609089
info@photoeditup.com
Photo Edit Up
651 N Broad St, Suite 206
Middletown, DE, 19709
United States